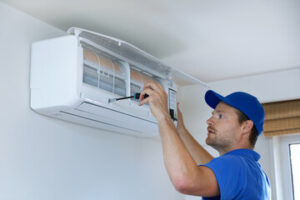
Keeping up with regular air conditioner maintenance can reduce the chances of unexpected breakdowns.
Your system uses dozens of parts to provide you with cool air. The thermostat reads indoor temperatures and switches your system on and off while internal coils move refrigerant, cooling your home.
The compressor is one of the most important parts of your air conditioning system. Unfortunately, it’s also one of the most expensive components to repair. Thankfully, there are some steps you can take to save money if your compressor is having problems. First, replace the air filter and double-check your thermostat settings. If these don’t solve the problem, it’s time to call an AC professional.
The first sign of a compressor issue is if your outdoor unit isn’t producing cold air. The compressor is responsible for compressing refrigerant gasses from a low temperature/low pressure liquid into a high temperature/high pressure hot gas, which is then blown through the condenser coils to cool the air.
If your air conditioner isn’t producing cold air, it could mean that the compressor is having issues with pressure or is defective. A licensed air conditioning professional will be able to determine if your compressor is salvageable or if it needs to be replaced.
Another sign that your compressor is having issues is if it’s having trouble starting up. This could be caused by a variety of things, so it’s important to examine each possible culprit. Make sure the power cord is plugged in and that the switch is turned on. Also, make sure that you’re not overworking the compressor by plugging it into too many outlets at once.
If your compressor is having trouble starting up, it may be because of a bad unloader valve. You can test this by opening the tank drain and allowing air to escape to simulate its function. If your compressor is leaking, it’s likely due to a lack of lubrication. A technician can re-lubricate your compressor and make sure that it has enough oil lubricant to operate correctly.
Repair the Thermostat
The thermostat controls your HVAC system by directing the flow of energy to different parts of your house. If your thermostat isn’t working correctly, it can affect the entire air conditioning system.
In some cases, a faulty thermostat may cause the HVAC system to short-cycle and run almost nonstop. If your thermostat is acting up, there are a few things you can do before calling for a professional AC repair service.
First, you’ll want to make sure the thermostat is receiving power. If it isn’t, check the circuit breaker box to see if any switches have been flipped off or blown out. You can also try turning the furnace off and then back on again. This will reset the thermostat and give it a fresh start.
If your thermostat is still not functioning properly, you’ll want to take a look at the device itself. You can do this by removing the cover and inspecting the wiring. If you notice any loose connections, make sure to tighten them. If the wires appear damaged, you may need to replace them.
You’ll also want to ensure that the thermostat is in a good location. It shouldn’t be exposed to drafts or obstructed by vents. Lastly, you’ll want to be sure that the device is level. You can do this by using a torpedo level or simply by repositioning it.
Another common problem with thermostats is that they become clogged with dust. This can lead to a variety of problems, including the thermostat’s inability to display a temperature. This can be easy to fix by removing the cover and wiping down the lever and bi-metal coil with a damp cloth.
Repair the Fan
A working fan will help keep pests like flies, gnats, and moths from getting into your home. If the fan is broken, it can allow these pests to make their way inside and cause problems with your air conditioning system. During an AC repair, your technician will check the fan for any issues. They will also test the refrigerant levels, ensure the fan is turning properly, and examine all electronics, safety controls, and wiring.
The first thing to do before doing any kind of maintenance on your fan is to turn it off. You should also close the vent in your ceiling or wall that the fan is in. This will prevent any dirt or dust from entering the motor and causing it to overheat.
Next, you should remove the grille from the fan. Then, you can remove any screws or snaps that hold the two components together. You can also use a screwdriver to unscrew the screws and pull the cover off of the fan.
When you’re done, you should be able to see the motor and the pin that holds the blades in place. If the blades aren’t spinning, there could be a problem with the pin. Try rubbing some oil on the bolts that hold the pin in place. This will create less friction and get your fan’s blades spinning again.
Another common problem with fans is when they start to wobble. This can lead to damage to the blade-assembly shaft and decrease your fan’s efficiency. You can purchase a balancing kit for your fan or you can tape small washers to each of the blades. This will help to balance the fan and reduce its noise and vibration.
Repair the Coils
Coils are an important part of your AC system, they help to cool the air by absorbing and releasing heat. When a coil is dirty, it can cause the cooling process to slow down or even fail completely. This is why it’s important to have your evaporator coil cleaned and maintained by a professional regularly. Keeping your coils clean can improve energy efficiency, help to prevent refrigerant leaks and save you money on your energy bills.
The evaporator coil is located in the indoor portion of your air conditioner near the furnace or air handler. It is typically behind a piece of foil-wrapped insulation at the front of the plenum box. Before attempting to access this area, turn off the unit and remove the tape and screws that hold the cover in place. If the coil is frozen, turn off the system and wait for a few hours to see if it will defrost naturally. If not, you can turn it back on and set the thermostat to “Defrost” mode so that the fan will blow continuously, moving the warm air over the coils, which may allow them to thaw.
You can avoid the need for an evaporator coil repair by cleaning the area around it regularly and removing any debris or weeds. It is also recommended that you trim any vegetation back a few feet to allow for adequate airflow. You can also use a garden hose or a shop vac to remove any dirt or dust on the coils, or a commercially available AC coil cleaner. The aluminum fins on a coil are easily bent, so you should occasionally straighten them using a tool from an AC wholesaler. If you find that you need to replace the coil, be sure to choose one designed for your particular AC unit type. If you attempt to use a replacement coil that’s not the right fit, it can cause your system to work harder than necessary, which will increase your energy bill and shorten its lifespan.
Repair the Combustion Chamber
The combustion chamber is the heart of your furnace’s heating cycle. When it’s compromised, your air conditioner will not function properly and can put you and your family at risk of carbon monoxide poisoning. Look for the following three signs of a defective combustion chamber.
The first step is to remove the combustion case cover and inspect the external surface for evidence of hot spots or exhaust leaks. If the cover is cracked or warped, you must replace it. It’s also important to check the turbine nozzle, nozzle guide vanes and first stage blades for damage, warping or foreign object debris.
Once the combustion case is open, you must vacuum any loose particles of rust and soot from the interior. A special soot vacuum with a HEPA filter is recommended to prevent the fine particles from becoming airborne again after they have been sucked up.
Another method to repair cracks in the combustion chamber is to apply a high-temperature epoxy. The epoxy must be completely dry and free of oil before applying it, and the cracks should be sanded or ground to create an even surface. Some epoxies can even be drilled and tapped to restore broken bolt holes.
For more advanced repairs, the combustion chamber may need to be removed and re-assembled. This is more difficult than simply replacing a faulty part, and it requires specialized equipment like a borescope. However, the specialized tools and training make this process far less intimidating than it might seem to the novice technician. When it comes time to perform the re-assembly, it’s important to follow the directions carefully and take notes on each component so it can be returned to its proper position.